
Simple E30 ABS Delete Guide & Info
The decision to retain your likely non-functioning E30 ABS system comes down to personal preference and application. While it is arguably "safer" in slippery conditions and may save you a few tenths on the track, deleting the pump will not cause any issues with brake feel or performance and has its advantages. As mentioned before, many of these systems haven't worked properly for years. The pump is no longer available and it's common to see dried out and severed ABS sensors and cracked plugs from age and neglectful maintenance habits that can be costly to replace. It frees up a ton of space in the engine bay for a swap, custom intake, or turbo setup, and removing the entire system with wiring yields a considerable weight reduction. This is a fairly simple afternoon project and only requires a few easily attainable and affordable specialty tools for flaring and bending brake lines and materials that you can pick up at your local parts store. The process for pump removal and line routing explained below is universal for most E30 chassis.
*Some early models will have a large proportioning valve and additional lines under the master cylinder. This will all be removed during this process with no negative effects on the factory braking system's performance or feel. If you would like to retain the Proportioning Valve it is still available and has a PN: 34331152494
Tools and Materials
There is a huge variety of brake line tools available but at a minimum, you will need a basic line bending and cutting tool, and a flaring kit. Be sure the kit is specifically for a metric line with a bubble flare. These kits are often available to rent from your local parts store and can also be found on amazon. Link to the kit pictured is at the bottom of the article. Additionally, you will need a small variety of wrenches ranging from 8-13mm to remove the pump and lines. With our method, you only have to make one flared connection to line 4 in the diagram below. An alternative option is to skip the flare tool and simply remove line 4 from the engine bay and have it professionally done at a professional shop or hydraulic fitting and hose distributor with the necessary tools (Pirtek).

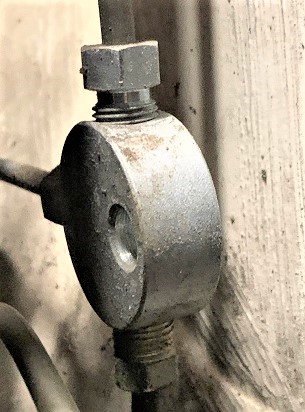
You will also need an M10 x 1.00 3-way union to split the feed off of the master cylinder to the front-left and front-right brake calipers. There are many out there available for cheap online, from your local hardware store, Pirtek, and most auto parts stores. A link to one we recommend is at the bottom of the page.
Your local parts store should also carry a decent selection of replacement brake lines. The most common brake line size for most BMW's and particularly true for E30's is 4.75mm with an M10 x 1.00 flare nut. This will be sold as 3/16 and pre-terminated with two M10 x 1.00 flare nuts. This is perfectly fine because 3/16 = 4.76mm, but confirm the pre-made replacement line has a metric bubble flare as there will likely be a couple of styles available. You will need two 6" sections to connect the master cylinder to your 3-way union and the other to go from the 3-way to the front left brake caliper. You will also need a 10"-14" section (depending on how you route it) to connect the Master cylinder to the rear brakes. We also recommend you pick up fresh brake fluid, a few cans of brake clean, and a new brake master cylinder since everything is apart and it's likely the factory unit and wouldn't hurt to replace. This would also be a good time to install a set of Garagistics Stainless Steel Braided Brake Lines linked at the bottom of the page!
ABS Pump and Line Removal
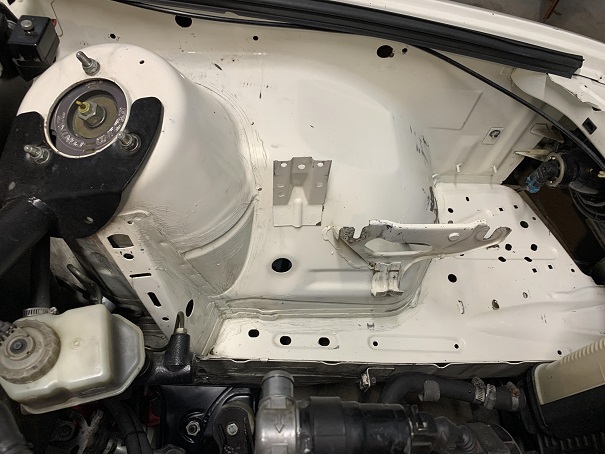
We need to remove the air intake assembly by loosening the large hose clamp at the throttle body and the two 10mm nuts securing the airbox. Be sure to disconnect the AFM and any other plugs or connections to the air intake assembly. Unbolt the charcoal canister and power steering reservoir from the strut tower and let them hang out of the way. Late models may want to move the coolant reservoir out of the way as well by simply pulling up on the reservoir from the side closest to the firewall. With everything removed you can access the ABS pump and brake lines with relative ease. Go ahead and pop the top on the brake master reservoir and remove the fluid with a turkey baster or your preferred method. Place a generous amount of paper towels or rags around the base of the ABS pump and around the master cylinder to catch any leaking fluid. Brake fluid will turn your paint into mush so take your time and cover your fenders with towels for protection.
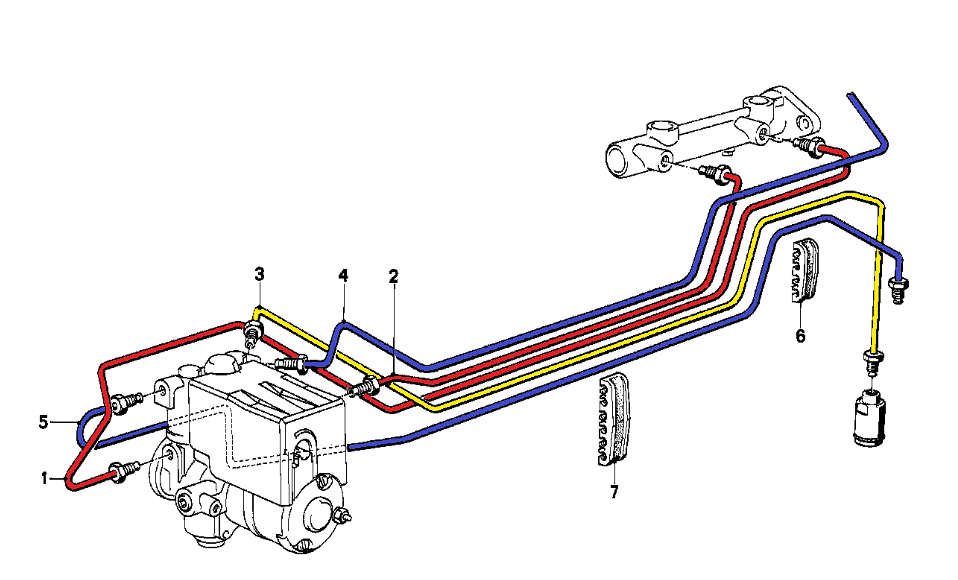
The goal is to not make a mess so work with some finesse. Start off by removing line 1 at the ABS pump. It may take a little force and bend but you want to move the line enough to place a small container under it let it drain. Once it stops dripping, remove the line 1 connection at the master cylinder and set it aside. All the lines are full of brake fluid still so we will repeat this process with each connection at the pump as we remove them. Next, remove lines 2, 3, and 5 and set them aside as well. Line 4 routes behind the brake booster to the passenger side caliper and will have to be cut and flared to mate at the 3-way union. At this point, I would recommend removing the brake master cylinder and give yourself more room to work when you make your flared connection on Line 4. Make your cut at the spot marked by the black box on line 4 in the picture below.

It can take a couple of tries to get the desired result from your flaring tool if you have never used one before. We included a Youtube link at the bottom of the page explaining how to properly use the flaring tool.
Do not forget to put your M10x1.00 brake fitting on the line before you flare it! I repeat...DO NOT FORGET TO PUT YOUR M10x1.00 BRAKE FITTING ON THE LINE BEFORE YOU FLARE IT!
You will hate your life.
Finally, unplug the ABS pump by removing the 10mm hardware securing the plastic cover. The pump is secured by a 13mm nut on one side and comes out after loosening the hardware securing it to the chassis on the opposite side of the pump.
This should be all of the ABS hardware in the engine bay aside from the wiring. Take a minute to pick up any rags or paper towels used to catch leaking fluid and wipe down any surfaces in the workspace with degreaser and a clean rag to prevent rogue brake fluid spills from dissolving the paint.
New Line Routing
We are going to start by reinstalling the master cylinder so we can mock up the new lines. The 3-way union will use the two 6" sections of pre-made brake line to connect the front brakes. The photos below give you an idea of how you're going to need to run your lines. The portion of the master cylinder outlined in blue closest to the booster supplies pressure to the front brakes. We recommend a 90* bend on the line secured to the master cylinder so it is pointing down when installed and thread the other end into the top port of the 3-way union outlined in red below. It should require two simple bends in your last 6" section of brake line to make the to the front left brake caliper outlined in red on the bottom. Bend the line running behind the booster from the front right brake caliper so that it threads into the final port outlined in red on the left. Tighten everything down very snug and move on to the last line that supplies pressure from the master cylinder to the rear brakes. This connection is made using the longer section of the three replacement brake lines we picked up and is outlined by the yellow boxes in the picture below. Make the necessary bend to connect the line and tighten it down.


Finishing Touches & Tips
Have someone help you bleed the brakes with fresh fluid. Check for leaks at this time before reinstalling the air intake and securing any other removed components! If any fittings leak, tighten them down more. They can take a reasonable amount of force to seal. Once you are confident all the air is out of the system, wipe everything down and take it for a test drive!
Helpful Links
Bubble Flare Instructional Video:
https://www.youtube.com/watch?v=sqzj2HqGLDc
Bubble Flare Tool:
Amazon Link to Stinger Metric Bubble Flaring Tool Kit
3-Way M10x1.00 Union:
Amazon Link to 3-Way M10 Union (T junction)
E30 Stainless Steel Brake Lines:
https://www.garagistic.com/products/e30-stainless-steel-brake-lines
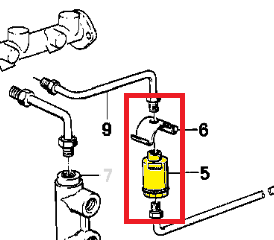
*Some early models will have a large proportioning valve and additional lines under the master cylinder. This will all be removed during this process with no negative effects on the factory braking system's performance or feel. If you would like to retain the OEM proportioning valve it is still available PN: 34331152494
Simply install in between the rear line from the master cylinder and the line junction to the rear in the engine bay. This is highlighted below
We hope this short ABS delete guide offers some help during your install!
Comments
1 comment
Great write up. Thanks. But it looks like it would be a real pain to get the air out of the master cylinder line to the union and also out of the line from the union to the front passenger brakes.
Please sign in to leave a comment.